Apple Pie with Maple Syrup Recipe
This homemade apple pie with maple syrup offers a delicious balance of flavors. Sweetened naturally with maple syrup and made from scratch, it has a flaky crust and homemade apple pie filling.

Maple Syrup Apple Pie
Looking for the perfect apple pie recipe with maple syrup? This delicious recipe features juicy honeycrisp apple slices coated in natural sweetness from maple syrup and warm spices in a flaky homemade pie crust.
This apple pie is healthier, naturally sweetened with maple syrup, and free of refined sugar. Say goodbye to worries about a soggy crust and mushy apples.
In this post, discover the best apples to use, learn how to make the apple pie from scratch, and get the best tips for achieving a perfectly baked pie.
This naturally sweetened apple pie will be a hit for a holiday gathering or a cozy dessert!

Best Apples for Apple Pie
The best maple apple pie starts with good baking apples. You want to use firm apples that will hold their shape during baking.
I like to use Honeycrisp apples as they are naturally one of the sweeter varieties. Therefore, they don’t require a lot of sugar to balance out the tartness of varieties like Granny Smith apples.
- Granny Smith – has long been considered the favorite for apple pies because they are extremely firm and tart apples.
- Honeycrisp – one of the sweeter varieties, they stay relatively firm and have a great combination of flavor and texture for your pies.
- Golden Delicious – a nice blend of sweet and tart, but does lose a bit of firmness when cooked.
- Jonagold – has a firm texture and a flavor with hints of sweetness and tartness.

What Do you Need to Make Apple Pie?
Here are my favorite pie-making tools to make the job easier:

Maple Syrup Apple Pie Ingredients
There are two parts to making an apple pie sweetened with maple syrup, the apple pie filling and the flaky pie crust.
Here are the simple essential pantry ingredients you will need:
Apple Pie Filling with Maple Syrup Ingredients
- Honeycrisp Apples: You will need enough apples to fill the pie plate. They will need to be peeled and cut into small pieces.
- Flour: All-purpose flour is used to thicken the filling.
- Maple Syrup: Instead of using brown sugar to sweeten the filling, this recipe uses pure maple syrup to add sweetness.
- Spices: Delicious fall spices of cinnamon and allspice are added to the apple pie filling.
- Vanilla: complement this delicious pie’s warm flavors with a little bit of vanilla.
Flaky Pie Crust Ingredients
This makes a traditional pie crust for one 9-inch pie plate with a latticed or whole top.
- Flour: All-purpose flour, preferably chilled in the fridge to help keep the pie dough cold.
- Salt: I use Celtic salt in all my baking and cooking recipes.
- Shortening or Lard: Avoid using highly processed, hydrogenated lard you’ll find on grocery store shelves. Instead, use high-quality rendered leaf lard.
- Ice Cold Water: For best pie results, use ice cold water to help keep the fat cold.

How to Make Maple Apple Pie
Here is how to make the best maple apple pie recipe:
Make the Pie Crust
- Mix flour and salt in a mixing bowl.
- Cut the shortening or lard into the flour mixture using a pastry cutter until the mix resembles coarse crumbs or tiny peas.
- Add cold water, one tablespoon at a time, tossing the mixture lightly and stirring with a fork. Continue adding water until the dough is just moist enough to hold together. The dough should not be sticky.
- Divide dough in half and shape it into a smooth ball. Wrap in plastic wrap or wax paper and refrigerate for 30 minutes.

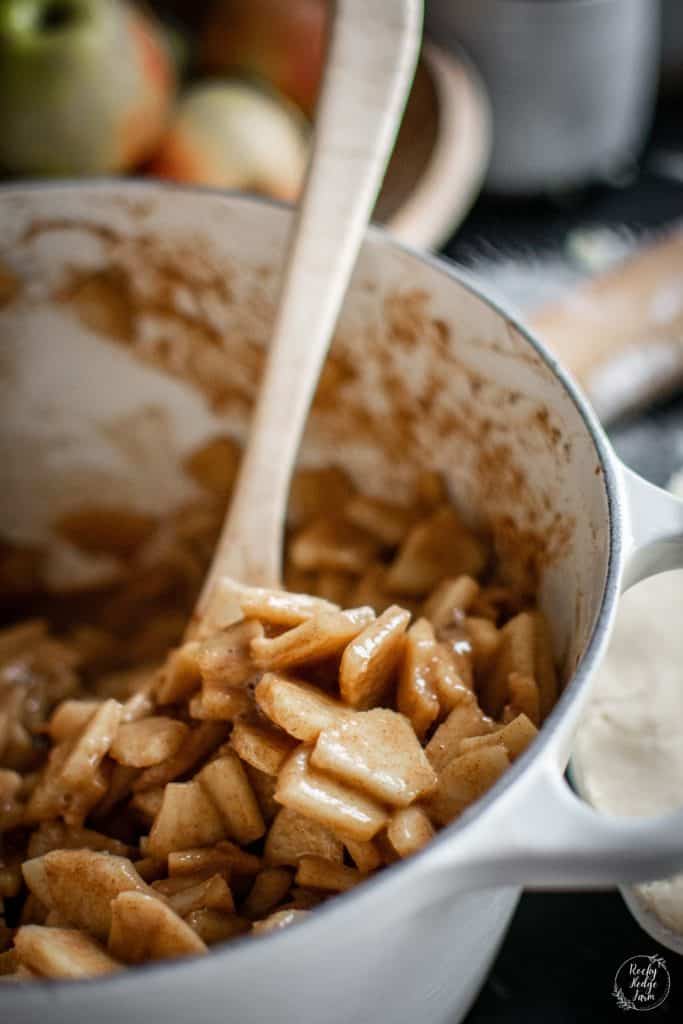
Make the Stovetop Apple Pie Filling
- The first step is to peel and slice your apples to about 1/4-inch thick. To fill a deep dish pie plate, you will need about 8 cups of sliced apples (3.5 -4 pounds).
- Toss the apples with all-purpose flour, maple syrup, cinnamon, allspice, and vanilla in a dutch oven.
- Cover and cook the apple mixture over low – medium heat, stirring frequently, until apples are fork tender but still hold their shape, 15-20 minutes.
- Remove from the stovetop and let the apple pie filling mixture cool to room temperature for 30 minutes. As the filling cools, roll out the pie crust for the top and bottom of the pie.

Roll Out the Pie Crust
- Divide the pie dough in half and shape it into two flat balls. On a lightly floured surface, roll the dough lightly with short strokes from the center out in all directions to 1/8″ thickness.
- Fold the rolled dough in half and carefully place it into the pie plate with the fold in the center. Unfold and fit it into the pan, gently pressing out air pockets.
- Using a sharp knife, trim the edge even with the pie pan. Using a fork, poke holes in the bottom of the crust. Roll the top crust.


Assemble the Pie
- Transfer the apple pie filling to the bottom crust of the pie dish.
- For a whole pie, gently add the top crust to the pie. Trim the dough to 1/2″ beyond the edge of the pie. Fold the top edge under the bottom crust and press gently with your fingers to seal. Crimp the edge as desired.
- Cut vents in the top crust to prick with a fork to allow the steam to escape.

Bake
- To prevent the edge of the crust from over-browning, cover the edges of the pie crust with a piece of aluminum foil or a pie crust shield.
- Heat oven to 450 degrees and bake the pie for 10 minutes; reduce the oven temperature to 350 degrees and bake another 20-30 minutes.
- Remove the pie shield and bake another 15 minutes until the crust is golden brown and the filling is bubbly.


Cool and Serve
- Allow the pie to cool to room temperature before serving to allow the filling to thicken. Dollop a little vanilla ice cream on top for the perfect Fall dessert!

Tips for Making an Easy Apple Pie With Maple Syrup
- Store Bought Crust – If you want an easier option, use pre-made pie dough. Remember, this recipe is a double crust, so get enough dough.
- Prevent Browning – Cover your pie crust edges with aluminum foil or a shield to stop them from getting too brown.
- Top Crust – There are various ways to design the top crust of the pie. You can lay it flat and cut vent holes, create a lattice pattern, or use cookie cutters to arrange dough shapes on the filling.
- Let the Pie Rest – Resist cutting the pie right after baking. The pie continues cooking when taken out of the oven. Allowing it to rest helps the filling thicken, and the flavors meld.
- Cold Ingredients – Keep your ingredients cold while working for the best flaky crust. Use cold flour, ice water, and chilled lard. Before rolling the pie dough, refrigerate it for 30 minutes.
- Precook the Apples – The key to a fantastic apple pie filling is cooking the apples before baking. This maintains their shape, prevents a soggy crust, and removes the gap between the filling and crust.
- Catch the Drippings – If you are worried about the pie overflowing in the oven, put a rimmed baking sheet on the rack below it.

Recipe FAQS
Should You Cook Your Apples Before Putting Them in Pie?
Yes, you should precook the apples. It helps them hold their shape in the oven, prevents a soggy crust, and eliminates the gap between the top of the apple filling and the homemade crust.
Does Homemade Apple Pie Need to be Refrigerated?
Apple pie should be stored in the refrigerator. Allow the apple pie to cool to room temperature, then cover it with either plastic wrap or store in an air-tight container.
How Long to Wait Before Cutting an Apple Pie?
Wait at least 2-3 hours, preferably overnight, before cutting into the apple pie. It takes time for the pie to cool thoroughly and for the filling to thicken fully, making it easy to slice and hold shape.
How to Eat Apple Pie?
Warm a slice of apple pie and top with a scoop of vanilla ice cream. If you don’t like the idea of ice cream, try a dollop of fresh whipped cream drizzled with caramel sauce. And, for an extra special treat at breakfast, enjoy a cup of hot coffee with your slice of apple pie!
What to Serve with Maple Apple Pie
Here are some delicious options to serve with maple syrup apple pie:
- Savor a scoop of homemade vanilla ice cream atop a warm slice of apple pie.
- Enjoy the flavors of a spiced chai latte alongside a slice of pie for the perfect cozy fall treat.


Printable Recipe Card
Maple Apple Pie

This Maple Apple Pie Recipe is easy to make, naturally sweetened with maple syrup, and easy to make from scratch! With the best flaky homemade pie crust and a homemade apple pie filling, this apple pie is a favorite for the holidays or a weekend dessert.
Ingredients
Flaky Pie Crust
- 2 cups sifted flour
- 1 teaspoon salt
- 3/4 cup shortening or 2/3 cup lard
- 4 to 5 tablespoons ice cold water
Maple Apple Pie Filling
- 8-10 cups peeled and diced apples
- 1/3 cup all purpose flour
- 2/3 cup maple syrup
- 1 tablespoon ground cinnamon
- 1 teaspoon allspice
- 1 teaspoon vanilla
Instructions
Step 1: Combine flour and salt in a mixing bowl.
Step 2: Using a pastry cutter, cut the shortening or lard into the flour mixture until the mix resembles coarse cornmeal or tiny peas.
Step 3: Add cold water, 1 tablespoon at a time tossing the mixture lightly and stirring with a fork. Add water until the dough is just moist enough to hold together. The dough should not be sticky.
Step 4: Shape the dough into a smooth ball. Wrap in plastic wrap or wax paper and refrigerate for 30 minutes.
Step 5: Peel and slice your apples to about 1/4-inch thick. To fill a deep dish pie plate, you will need about 8 cups of sliced apples (6-8 apples).
Step 6: In a dutch oven or large saucepan, toss together the apples with all-purpose flour, maple syrup, cinnamon, allspice, and vanilla. Cover and cook over low heat, stirring frequently, until apples are fork tender but still hold their shape, 15-20 minutes.
Remove from the stovetop and let the apple pie filling mixture cool to room temperature for 30 minutes. As the filling cools, roll out the pie crust for the top and bottom of the pie.
Step 7: Divide the pie dough in half and shape it into two flat balls. On a lightly floured surface, roll the dough lightly with short strokes from the center out in all directions to 1/8″ thickness.
Fold the rolled dough in half and carefully place it into the pie plate with the fold in the center. Unfold and fit it into the pan, gently pressing out any air pockets. Trim the edge even with the pie pan. Roll the top crust.
Step 8: Transfer the apple pie filling to the bottom crust of the pie dish.
There are multiple options for arranging and designing the top crust for the pie. You can place it on the pie whole, make a lattice pie crust, or use a cookie cutter and arrange the dough shapes on top of the pie filling.
Step 9: For a whole pie, gently add the top crust to the pie. Trim the dough to 1/2″ beyond the edge of the pie. Fold the top edge under the bottom crust and press gently with your fingers to seal. Crimp the edge as desired.
Cut vents in the top crust to prick with a fork to allow the steam to escape.
Step 10: To prevent your homemade pie edges from over-browning, cover the edges of the pie crust with a piece of aluminum foil or a silicone pie crust shield.
Step 11: Bake the pie in a preheated oven at 450 degrees for 10 minutes; reduce the heat to 350 degrees and bake another 20-30 minutes. Remove the pie shield and bake another 15 minutes until the crust is golden brown and the filling is bubbly.
Notes
- If you are short on time or prefer not to make the pie crust from scratch, you can use store-bought pie dough. This recipe requires a double crust, so be sure to buy enough pie crust.
- To prevent your homemade pie edges from over-browning, cover the edges of the pie crust with a piece of aluminum foil or a pie crust shield.
- There are multiple options for arranging and designing the top crust for the pie. You can place it on the pie whole, make a lattice crust, or use a cookie cutter and arrange the dough shapes on top of the pie filling.
- Allow the pie to rest and avoid the temptation to cut into it as soon as it comes out of the oven. When the pie comes out of the oven, it is still cooking. Allowing the pie to rest helps the filling to finish thickening and the flavor to come together.
- For the flakiest, most tender crust, it’s essential that you keep all of your ingredients cold as you work. Use chilled flour, ice water, and cold lard for the best results. Before rolling out the pie dough, place it into the fridge to chill for 30 minutes.
- The secret to a great apple pie filling is to precook the apples. Precooking the apples helps them hold their shape in the oven, prevents a soggy crust, and eliminates the gap between the top of the apple filling and the crust.
- For the most delicious fall treat, serve this homemade maple apple pie with a scoop of vanilla ice cream (homemade is the best)
- Place a rimmed baking sheet on the oven rack below the pie if you are concerned that it may bubble over in the oven.


Hi, I was disappointed in the the pie crust because their wasn’t enough dough to fit my 9 inch pie plate, the recipe should of called for 2/1/2 cups of flour, other then that everything else looks good