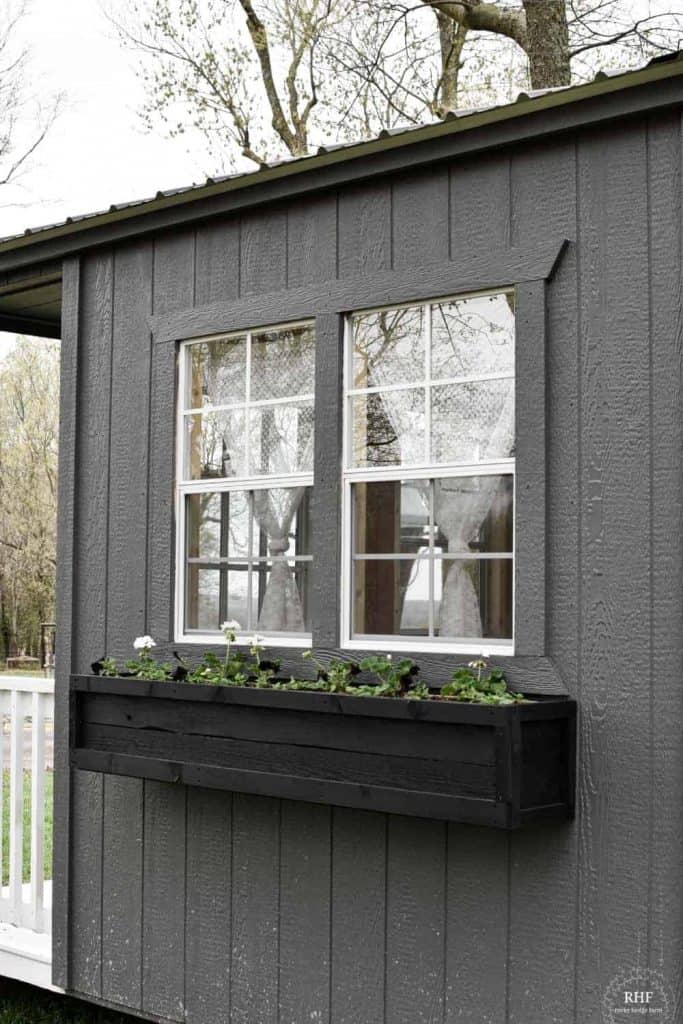
DIY window box planter with easy steps to follow to build your very own! Add character and curb appeal to the front of your home or garden shed.
These rot-resistant wooden cedar boxes add some old-fashioned farmhouse charm to an outdoor space.

Table of Contents
- DIY Garden Shed Window Box
- Why I Love This DIY Wooden Window Planter Box
- Tips for Building a Simple DIY Window Box Planter
- Tools and Materials
- How to Build DIY Window Box
- How to Hang a Window Box
- Best Fertilizer for DIY Wooden Window Boxes
- Best Flowers for Wooden Window Boxes
- Window Box Flowers for Sun
- Window Box Flowers for Shade
- How Many Plants Should be in a DIY Window Box Planter?
- Do DIY Window Box Planters Need Drainage?
- What is the Best Wood to Use for DIY Window Boxes?
- Subscribe to Email

In Missouri, the spring weather is finally making an appearance. The greenhouses are filled with beautiful flowers, and it has me anxious to start working in my flower bed.
It seems as though I tend to get in a bit of a hurry, especially when it comes to planting annual flowers too early. I have lost annuals in years past by putting them out while we have warm weather during the day, but the nights are cool.
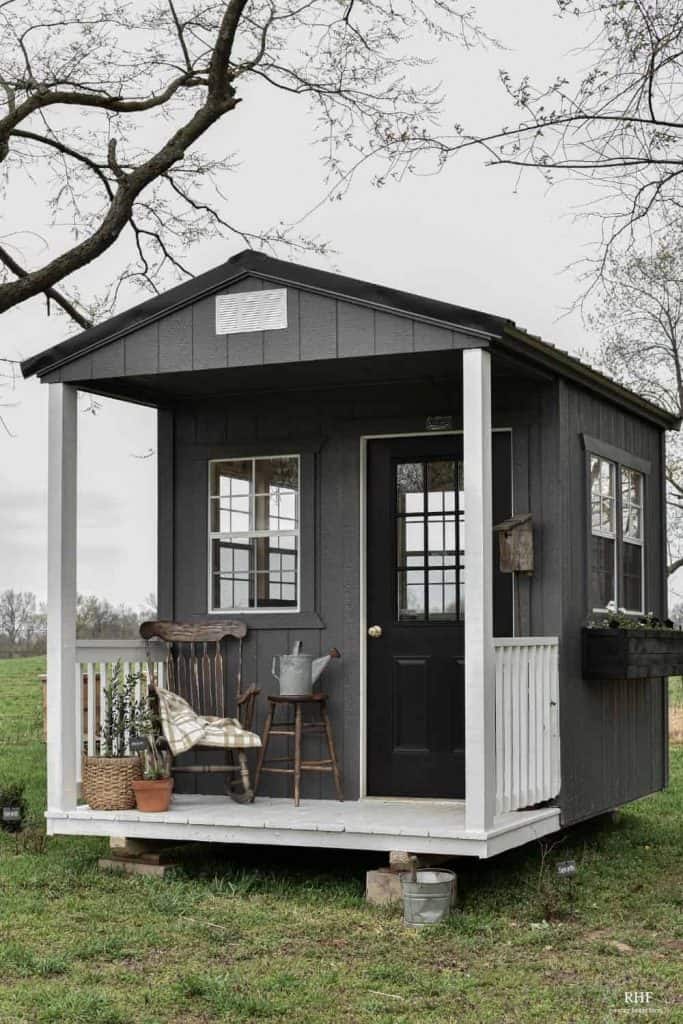
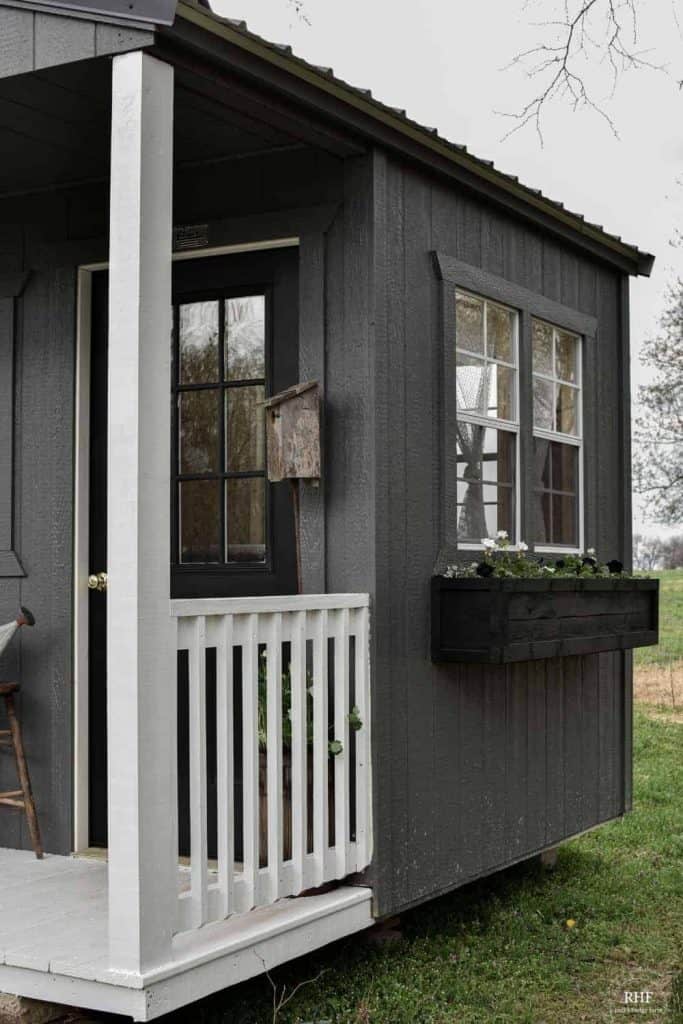
This year, I have added a garden shed to the backyard. While small in size, the garden shed is a great addition for storing garden tools, seeds, and a place to store my beekeeping supplies out of the weather.
With a small front porch and windows for natural light, the building already has a lot of character. Adding these DIY Window Planters gives it so much charm and makes a big impact with a simple design.
DIY Garden Shed Window Box
The backyard of our home is turning into a rustic garden retreat that I have always dreamed about. I can stand at the kitchen sink washing dishes and overlook the garden with our newly added kitchen windows.
The garden space is filled with raised garden beds, beehives, dahlias, and zinnias.
Now, a beautiful garden shed offers a space for storage, work, and a porch for resting. It also creates the perfect way for adding more beauty with window boxes, planted flowers, and vintage galvanized garden junk filled with perennials or annuals.
This easy DIY window box project is simple to build, and with just a few hours, you can also build a window box planter.

Why I Love This DIY Wooden Window Planter Box
- Window boxes are a great way to add color to a home no matter what the season. The look can be changed four times a year, for each season. From early spring and summer annuals, and fresh herbs to hardy plants, gourds, and pumpkins, there are many ways to change the look with the seasons.
- Window boxes are an easy way to dress up the exterior of your home or garden shed and add beauty, character, and charm.
- The plastic liners are removable. In our area, we experience warm days and cold nights during the early Spring season. The plastic liners, filled with flowers, can be lifted out and put inside the garden shed in the evening, This is the best way to get an early start on planting flowers, yet the frost will not kill the flowers when overnight temperatures get below freezing.
- These DIY simple window planters are long-lasting and will not fall apart since they have no wooden bottom board. Water does not sit in the bottom of the planter box but instead drains straight out since there is no bottom in the box.

Tips for Building a Simple DIY Window Box Planter
- Gather all of your power tools and supplies. Be sure to have everything you need. Building and creating is something that I love to do, but I hate stopping in mid-project to run to the store for something I forgot.
- Use long-lasting, rot-resistant lumber. Cedar boards are one of the best types of wood to use and are what was used to build the raised garden beds in our backyard.
- Pre-drill holes to prevent each wood piece from splitting while building the window box.
- Window boxes are very heavy. Locate where the studs are on the building in order to safely hang a window box that will not damage the home or building that which it is being attached to.
Tools and Materials
This post contains affiliate links; this means that I make a tiny commission off any purchase that you may make. This small commission helps keep Rocky Hedge Farm going at no additional cost to you. Please see my disclosure policy for information.
You can find my favorite kitchen essentials can be located in my Amazon storefront. While I often try to link to the exact products you see in my photos and videos, my pieces are usually vintage and often thrifted. However, I try to find and link replicas as much as possible, made in the USA or by other small shops, as I believe in supporting American families.
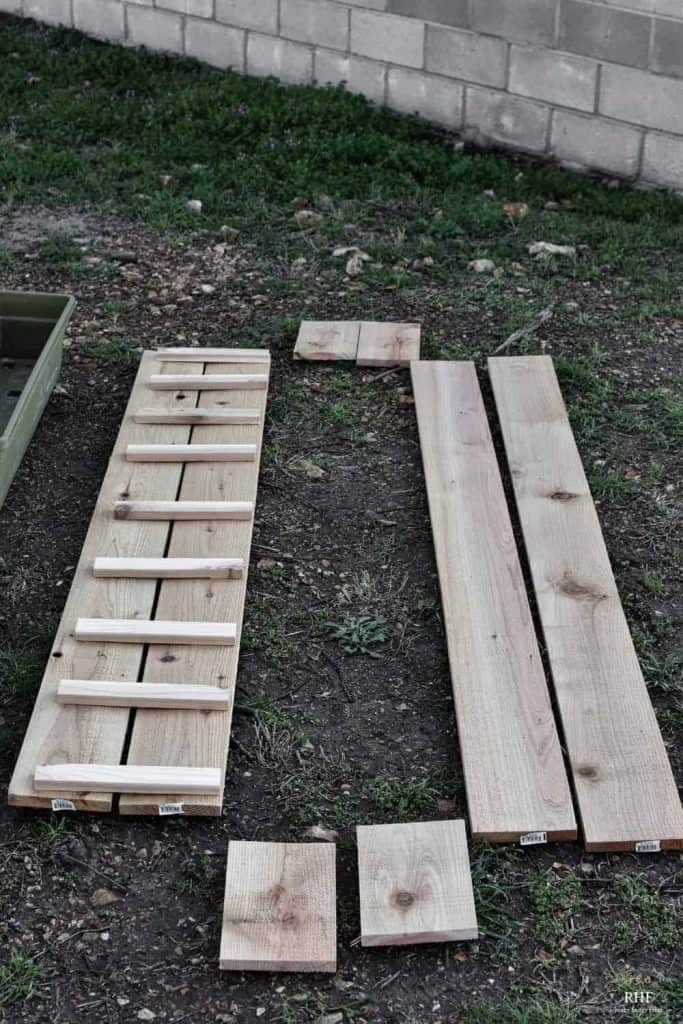
- 2 – cedar picket fence boards
- 3 – 1-in x 2-in x 8-ft Square Unfinished Cedar Board
- 120 grit sandpaper if sanding window box before painting
- Miter saw
- Drill/Impact
- Drill bit for pilot holes
- Tape measure
- Socket wrench
- Level
- Outdoor rated wood glue
- Exterior paint
- Paint brush
- Lag bolts
- Plastic planter boxes
- Flowers
- Fertilizer
How to Build DIY Window Box
To build DIY window box planters for your home or garden shed, it will have to be a custom design for your windows.
The width, depth, and length will determine the size of the box that you will need to build. These are general directions that I am giving, but make your dimensions fit the window box planter size required for your space.
Measure for Window Box
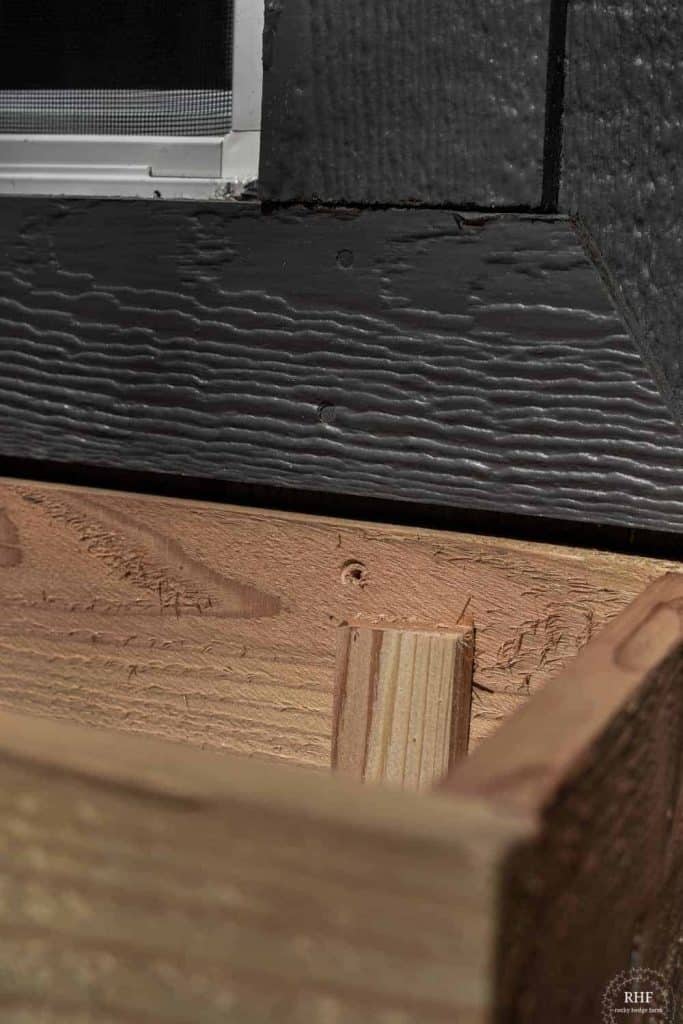
The first step is to use a tape measure to determine the length of the window. I measure from the start of the window trim on the left to the end of the window trim on the right.
If the window has shutters on either side; measure from the start of the shutter on the left to the end of the shutter on the right. Write the measurement down.
The depth of the window box should be deep enough to cover the front of the plastic liners that will sit inside the cedar wooden planter box. For the planter in this tutorial, it is built deeper than the liner. However, this was a personal choice for the desired finished look.
To determine the width of the window box, measure the plastic liners and add 11/2″ for the width of the boards that will hold the liners in place.
Make the Cuts
After determining the entire width of the planter, cut front and back boards to the appropriate length that matches the measurement. After cutting the front and back boards, cut two side pieces to the correct width that is needed.
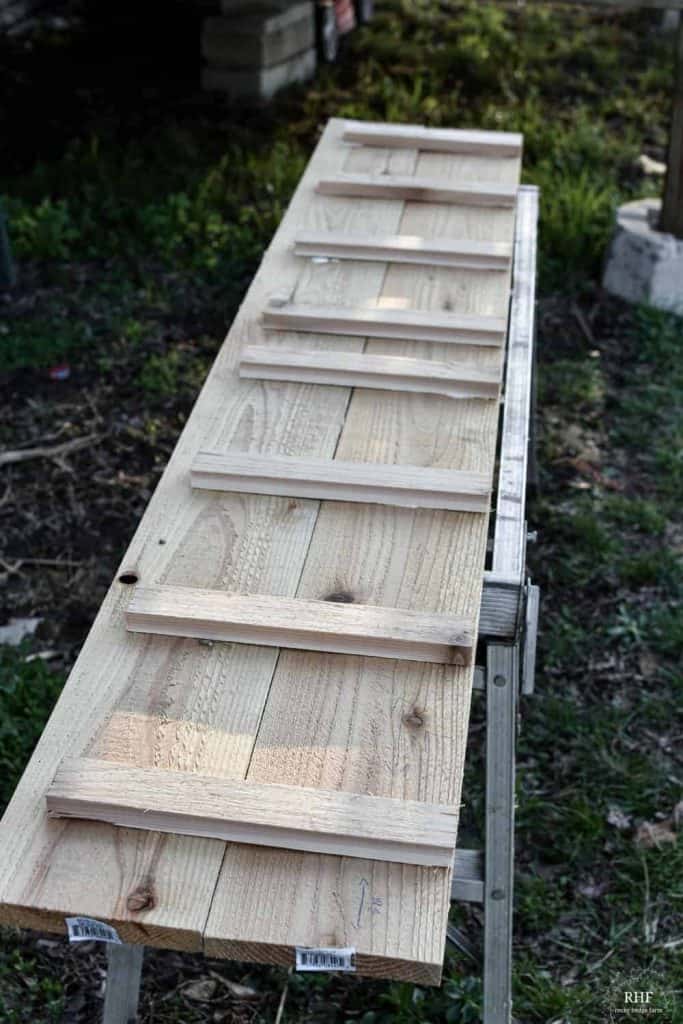
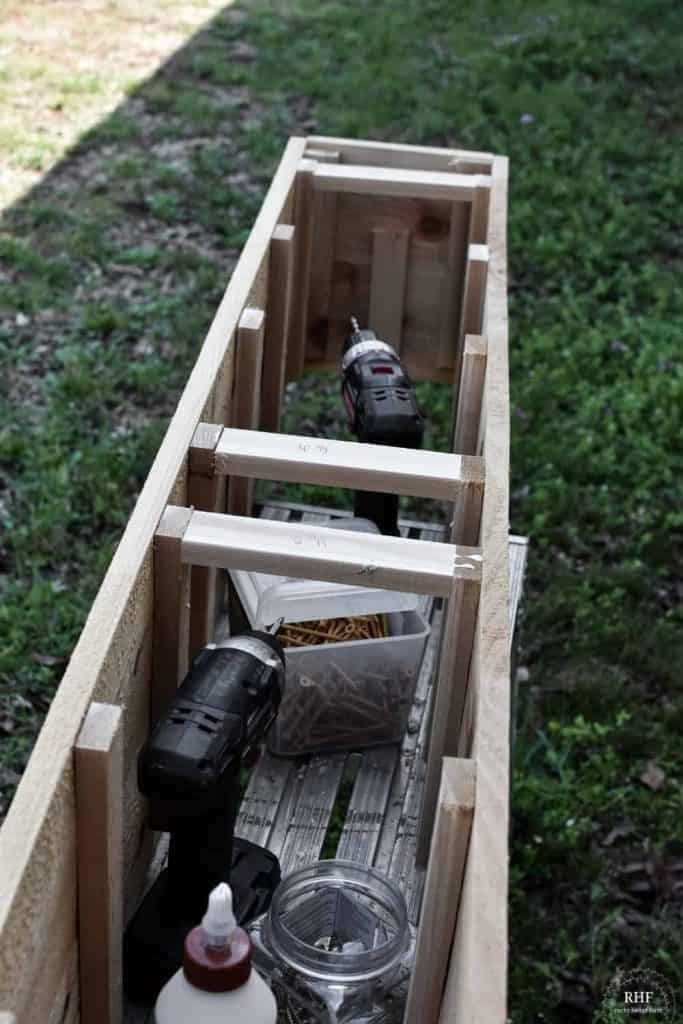
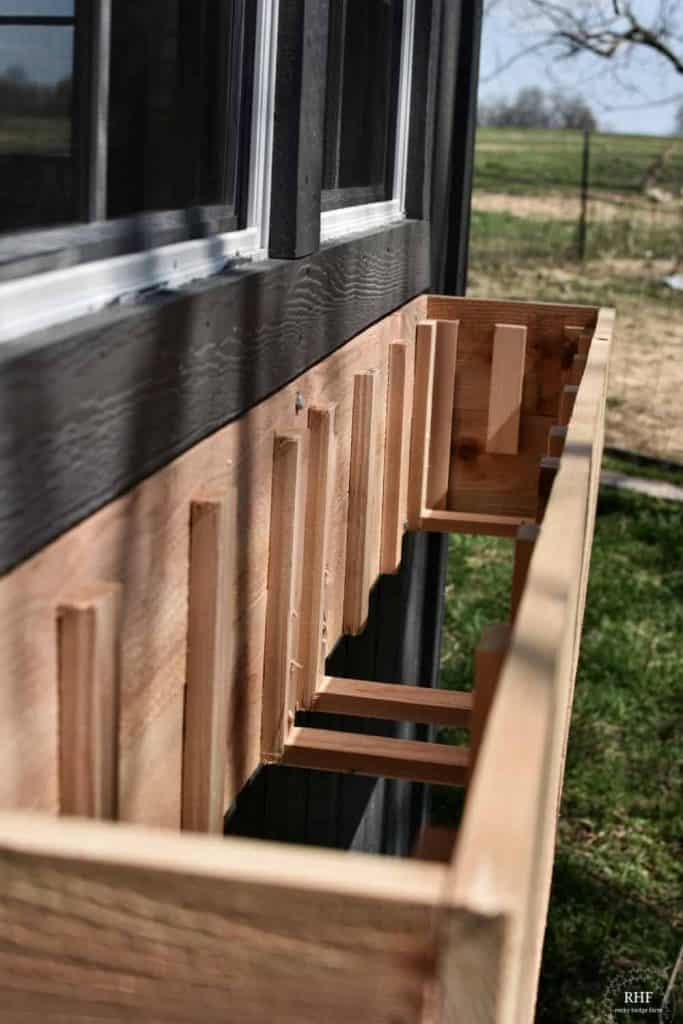
Attach Liner Supports
To hold the plastic window box liners in place, cut the 1-in x 2-in x 8-ft Square Unfinished Cedar Board into the size that will fit the built window box. The plastic liner will sit on top of these pieces, so leave about an inch or two from the top so that the plastic liners will be hidden behind the cedar window box planters.
To determine how far apart to place the liner supports, measure the plastic liners. For instance, my window box is 63.5 inches long. The plastic window boxes I used are each 30″ long. So, I placed the wooden liner supports far enough apart to hold the planters.
To attach the wooden liner supports, use exterior wood glue to attach them to the boards. Then, for extra support, screw them into place using wooden exterior screws. The wooden liner supports are placed on the front, back, and sides of the boards; the photos below show what this should look like.
Connect the Sides and Back
To assemble the sides to the front of the box, drill pilot holes for evenly spaced holes. Attach with exterior wood glue and exterior wood screws. Repeat with the other side of the box until all sides are together, forming the window box.

Add Bottom of the Window Box Support Pieces
This step may not have been necessary, but it was added for a few reasons. If I decide to add deeper liners in the future, the bottom support pieces will help hold the additional weight of the flower boxes. Two, it gives more support for maintaining the box together, making it last even longer.
The third thought was that in the future if I wanted to add wood brackets, there would be a place to attach them. However, after securing the window box to the garden shed wall, it is exceptionally sturdy, and these were probably not needed. So, for this step, determine if they may be required.
To attach the bottom pieces, I measured and cut the same board I used for the liner supports to fit the space. It was then connected with wood glue and exterior screws. To prevent the wood from splitting, pre-drill the holes for the screws.
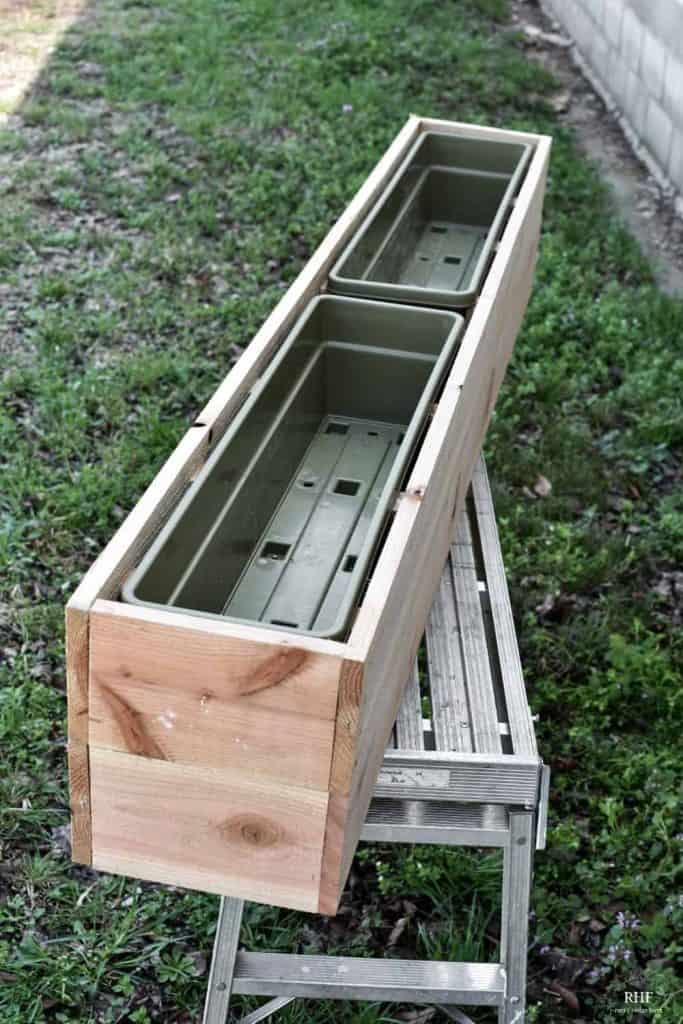
Check the Fit
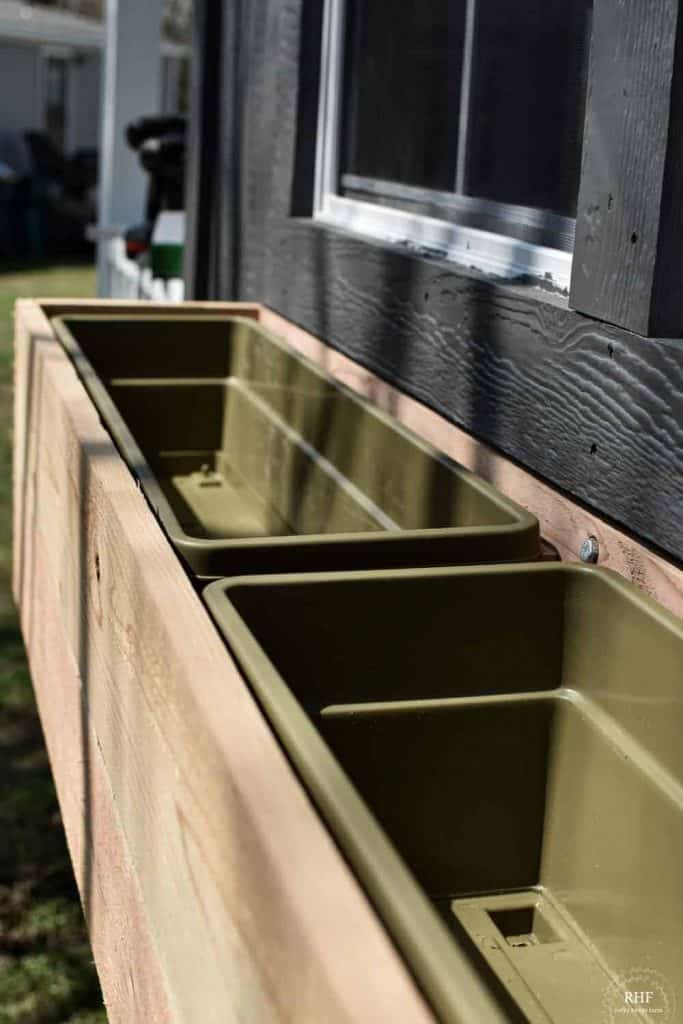
The old saying goes, measure twice and cut once. In this case, I often measured more than double to ensure that all of the measurements were correct. Once the box is built, flip it over and place the plastic flower box liners inside the cedar window box to ensure they fit.
The wooden liner supports are what the window box sits on for support. This window box is 63.5 inches long, and the liners are 30 inches long. There is a small gap in the middle where the window boxes do not touch. However, this will be unnoticeable once the flowers have all filled in.
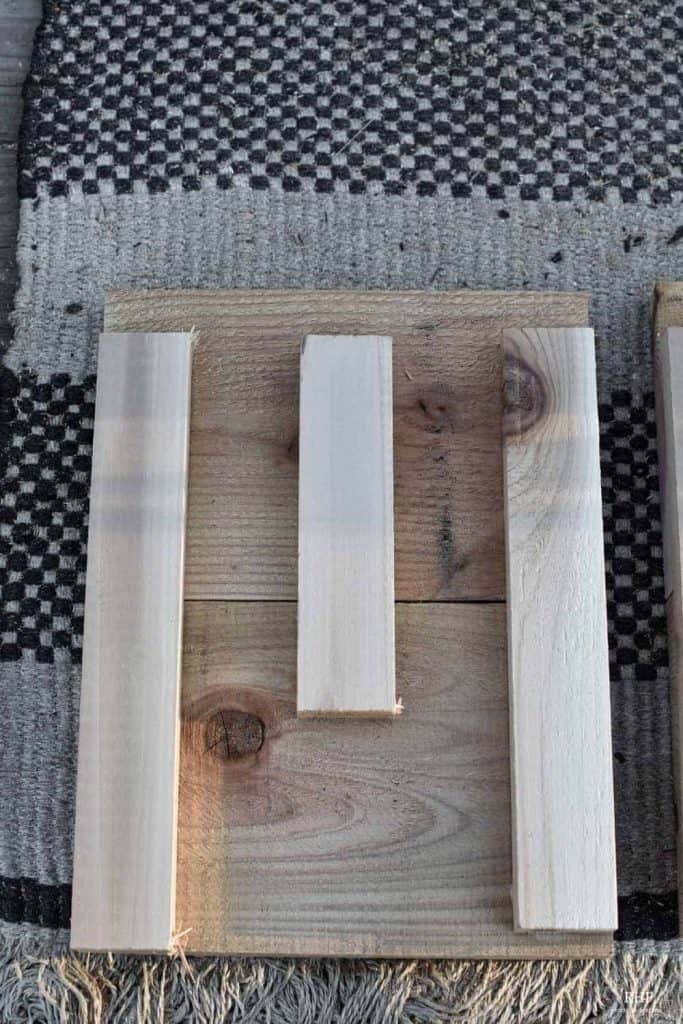
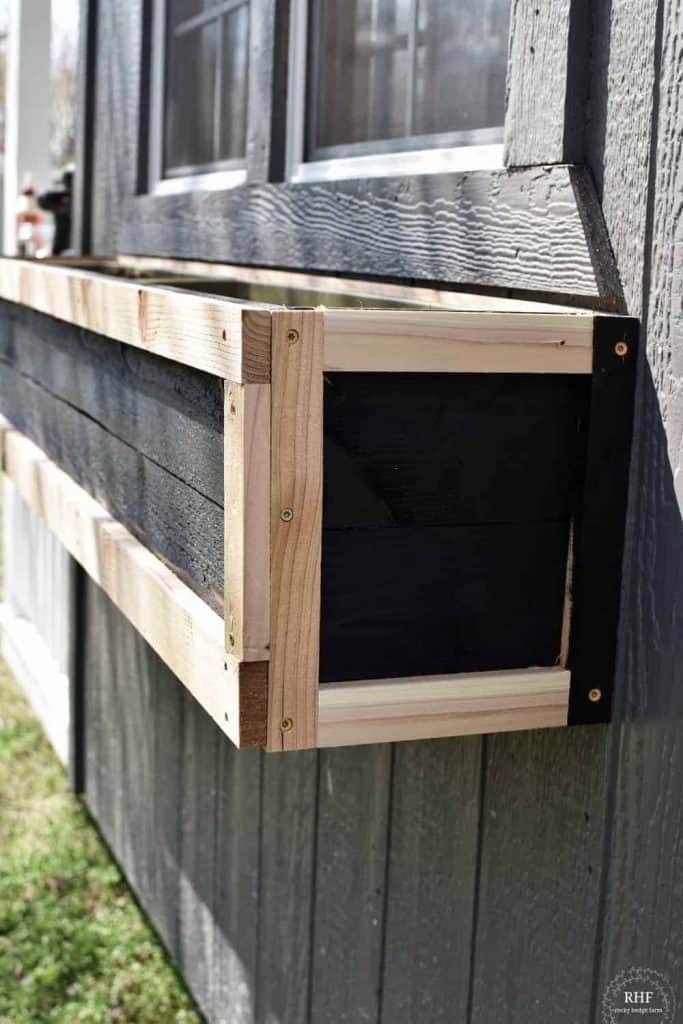
Attach Trim
As seen in the photo below, trim was added after the window box was hung. However, to make the process easier, the trim should be added before hanging the wooden cedar window box.
Without trim, the flower box looked a little plain. Instead of taking it back down, I measured the trim pieces, cut and attached them with exterior wood glue and wood screws.
Sand, Paint and Fill Nail Holes
Before planting the window box, sand, prime, and then paint the box an accent color to compliment your home or garden shed color scheme. Wood filler can be used to fill the screw holes if desired.
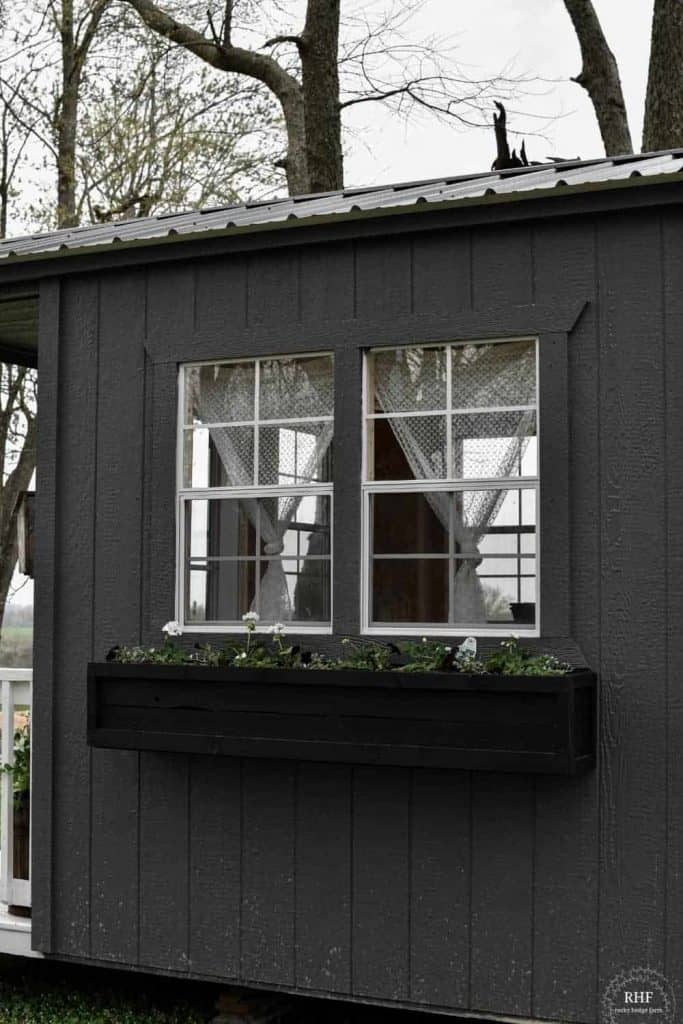
I would suggest painting the window box before it is hung to prevent the possibility of getting paint on the home or garden/potting shed.
The paint color on the wooden window box is called Tricorn Black from Sherwin Williams. This color was chosen so that it would match the front door of the garden shed.
How to Hang a Window Box
To secure a window box planter, the most important thing is to be sure that it is correctly attached to the wall of the building it is being hung on. An improperly hung window box can cause damage to your building, yourself, or others.
Locate Studs
Use a stud finder to locate the studs in the wall under the window. Mark the spot of each stud. It is recommended that you mount your window box to as many studs as possible.
Drill Pilot Holes
Center the planter box underneath your window. Mark where the studs are onto the box. Drill pilot holes through the backside of the box and into the stud. Be sure to align markings so that the planter box is level properly.
Attach Window Box and Add Liners
Bolt the window box planter to the wall using a socket wrench to attach it to the wall with lag bolts. Then, place the plastic window liners in the cedar window box.
Add Potting Mix and Flowers
Grab a sack of potting mix, which is designed explicitly for planters. Fill the window box planter 1”-2” from the top edge with the potting mix. Smooth out the potting mix. With the plants still in the containers, arrange your plants to whatever looks best for your visual look.
Stagger the position of the plants according to their height on the plants’ label. Taller plants should be placed in the back, with shorter ones in the front.
Start on one end of the window box, begin removing flowers from their containers, and plant. Gently break apart the bottom of the root base so that the roots will grow and expand faster. Then add in a fertilizer, and cover plants with extra potting mix and water.
Best Fertilizer for DIY Wooden Window Boxes
For fertilizer, I use Oscomote Plus. When planting, add one teaspoon for each bedding plant-sized plant. For a 4″ pot, use two teaspoons.
Work the fertilizer into the hole with the dirt and then plant. Water and rain will slowly release the fertilizer and feed the plants all season long.

Best Flowers for Wooden Window Boxes
With many plants to choose from, it can be overwhelming to choose which flowers are best for window boxes. Then, one must take into account what type of sunlight the plants will get. Do they need sun, shade, or maybe a little of both?
While every window box planter can be beautiful, there are a few simple steps in choosing flowers. A great design will include; thrillers, spillers, and fillers!
- Thrillers: Plants that add height, and are generally put either in the center or at the back of the window box.
- Spillers: Plants that hang over the edge of the window box and are placed close to the front edge.
- Fillers: Plants that make the container look full, are generally placed in front of, or around, the thriller plants. Choose plants that can be pinched back and will continue to flower or produce more foliage throughout the season.
Window Box Flowers for Sun
- Lanai White Trailing Verbena: A perfect choice with a trailing growth habit, it is an early bloomer with ever-blooming flowers all season long. Tolerant to drought, heat, and humidity
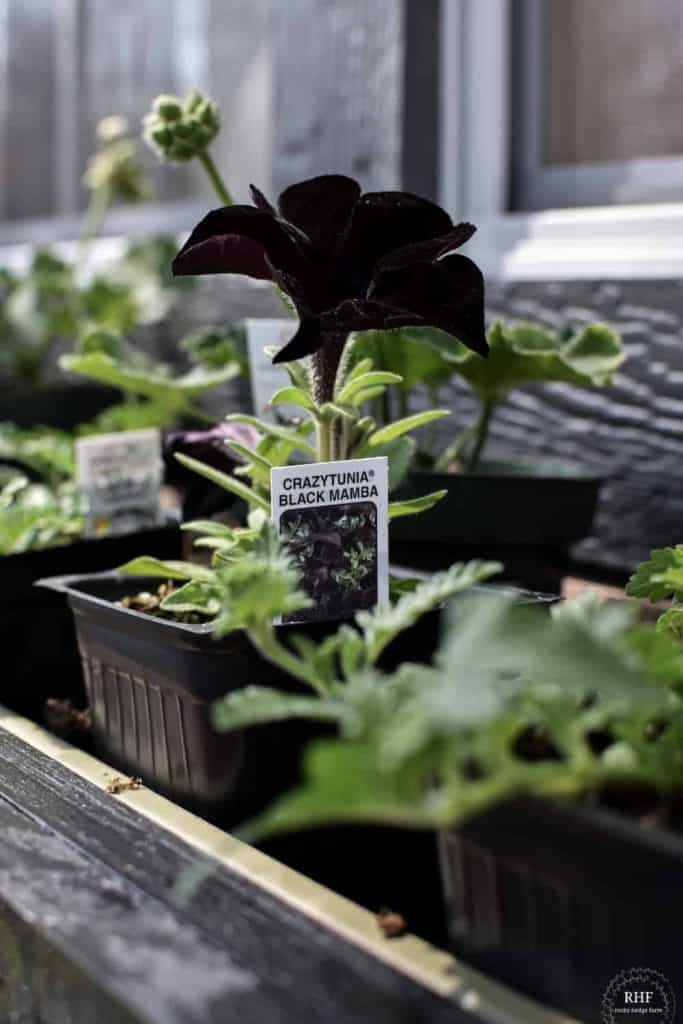
- Crazytunia Black Mamba: One of my all-time favorite petunias! This plant is a strong, fast grower that offers non-stop color all season long.
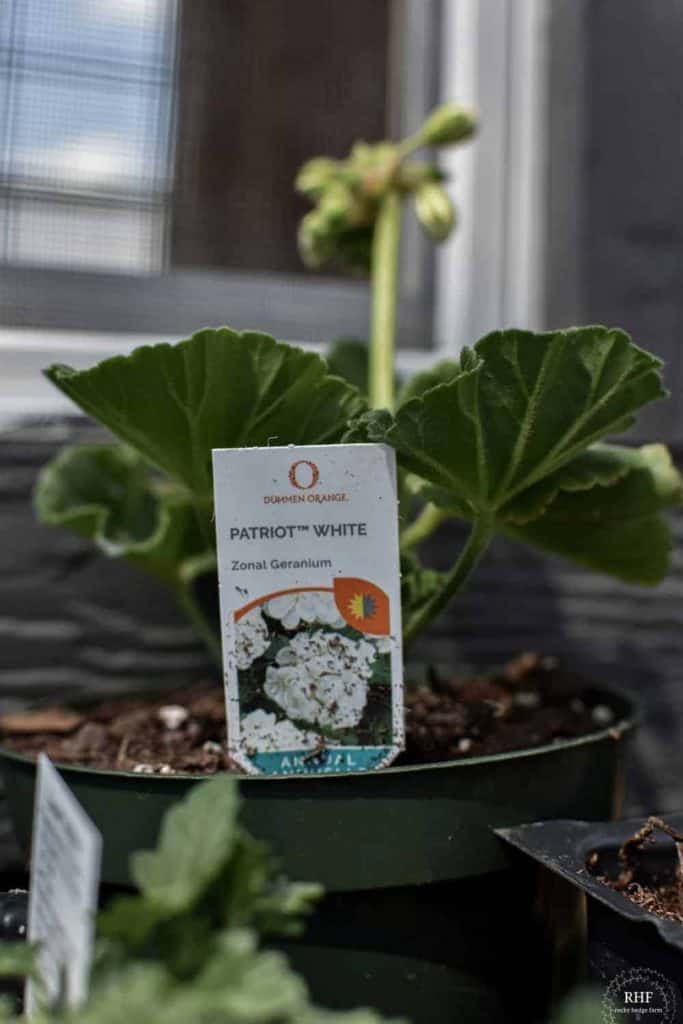
- Patriot White Geranium: Growing up to 18″ tall this is the plant to put in the back of the planter. With early flowering, large blooms, and being heat tolerant, this is a favorite in many of my flower gardens!
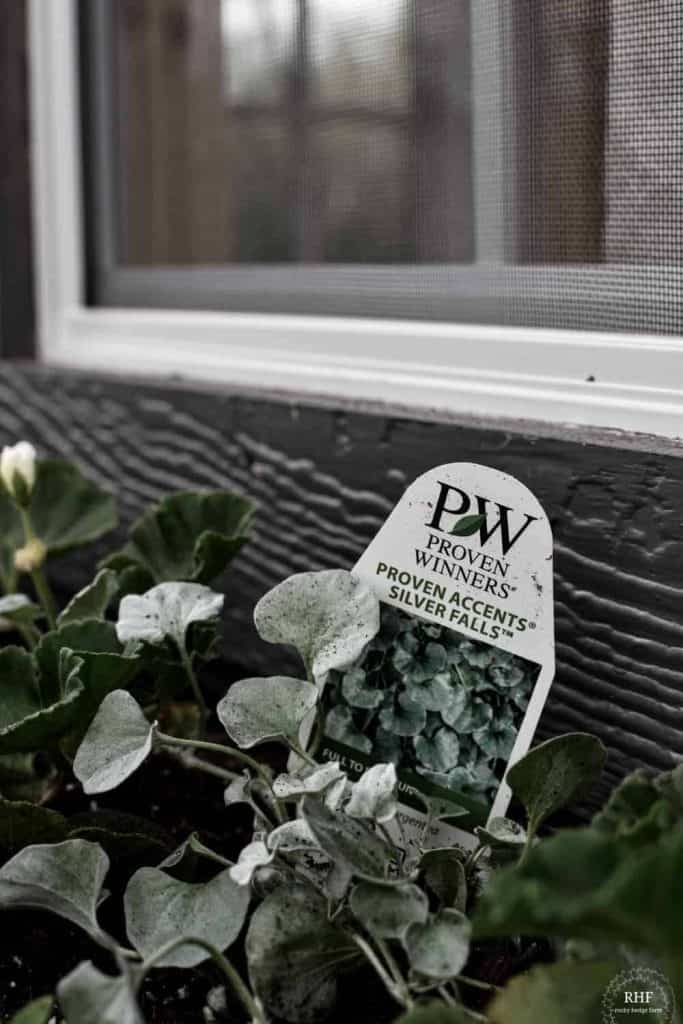
- Silver Falls: A vigorous, heat, and drought-tolerant trailing plant with shimmery silvery leaves that forms a mass of soft leaves. The plant requires no deadheading.
Window Box Flowers for Shade
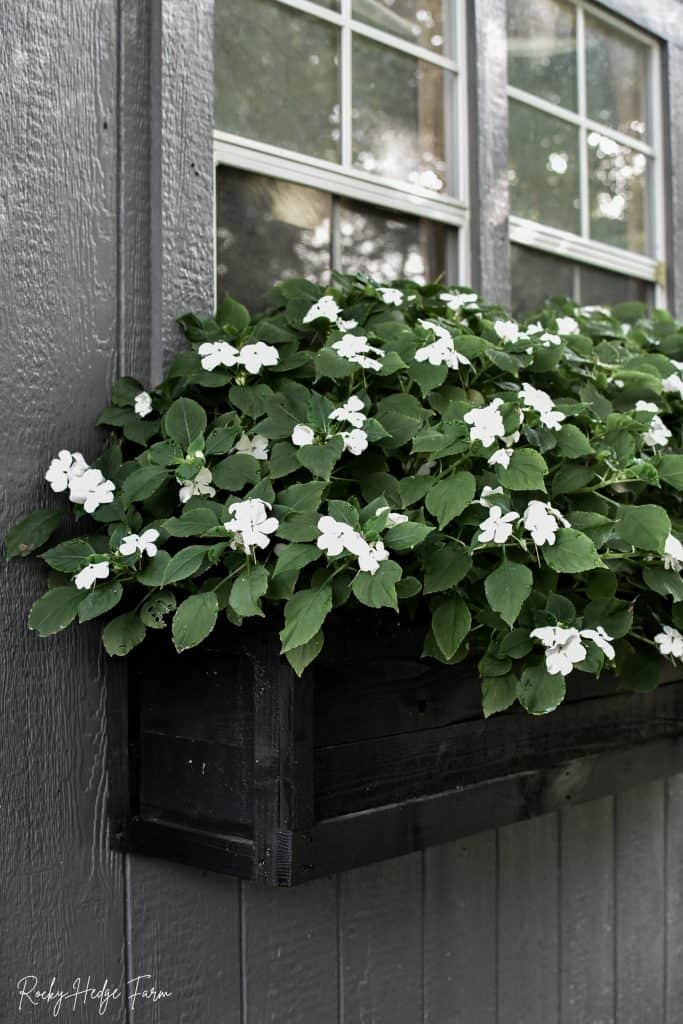
As the summer season came and the leaves on the trees began to fill in, I quickly realized I needed to switch out my flowers. The ones that I originally planted were growing but they were not thriving. So, I switched to one of my favorite annual flowers, Impatiens.
- Impatiens: Also known as Busy Lizzie, this variety is a traditional impatiens species and one of the most popular annual bedding plants. Available in various flower colors – from white to pinks, purples, and reds, they are easily found each year in garden centers.
How Many Plants Should be in a DIY Window Box Planter?
There is no “right” answer in determining how many plants should be in a window box. If you want a window box planter to look full right away, place as many plants as possible into the window box.
However, doing this can cause the plants to become crowded and more prone to disease problems.
I prefer to allow enough room between plants so that the planter looks full in several weeks. In a 30″ inch planter, I use 10-12 plants.
It takes some patience in waiting for the flowers to fill in and make a full window box. However, I have found that the plants seem healthier and last longer.
Do DIY Window Box Planters Need Drainage?
Wooden window boxes need drainage holes. One of the key benefits of building this DIY Simple Window Box Planter is that there is no board on the bottom of the planters. Any excess water drains out onto the ground.
Therefore, it will not rot and this makes the window box long-lasting. The plants will stay healthier and need less watering since they are planted in a plastic self-watering window box.
What is the Best Wood to Use for DIY Window Boxes?
Certain types of wood aren’t suitable for DIY building window planter boxes. Cedar is the best choice as it is both decay-resistant and affordable durable material.
Naturally insect and rot-resistant, cedar isn’t prone to splitting or splintering. It can be left natural, painted, or stained.

Adding a simple DIY window box planter to your home or garden shed adds beauty outside the window.
Filled with blooming annual flowers, perennials, or an herb container garden, these boxes add that extra bit of charm to your space.
This is an excellent easy project, even for beginners; I hope this project inspires you to build your own DIY window box planters and begin dreaming of ways to fill them for each season!
If you love flower gardening, take a moment to read some of my other favorite posts:
- How To Plant Dahlia Tubers
- Pinch out Dahlia for More Blooms
- How To Split Hostas
- How To Make A Petunia Hanging Basket
- Country Cottage Garden Shed
- How To Grow Impatiens Plants
- How To Grow Zinnia Flowers
- Rustic Garden Decor Ideas And Design
- Garden Shed Decorating Ideas
- Galvanized Planter Ideas
- How To Plant Bare Root Roses
- DIY Simple Window Box Planter
- How to Start Dahlia Tubers Early in Pots
- 8 Best Low Maintenance Perennials for Shade
Thank you Sarah – your shed is an inspiration. The window box adds beauty and charm to the shed. I appreciate your detailed instructions and beautiful photos. I love flowers and I want to share a flower combination with you. I use this combination in my flower beds. I plant a dainty orange Tassel Flower with white Orlaya. Both flowers are annuals and benefit from dead heading to keep the blooms coming through out the Summer. I send my best wishes to you for a productive garden season. Sincerely, Alice
Thank you!
The shed looks great…I’m envious! A perfect spot for all your garden goodies…maybe a rocking chair, too!
thank you so much!
Your shed is a dream. Will you pist more photos? What size is it?
Yes, I will be sharing more in the future. It is an 8×8 with a 4 ft front porch.
Thank you for helping me know how to make such an easy window box and your shed is so stink’n cute, love it, Pinned so wouldn’t forget any details, have a wonderful Easter, He is risen!
Hello there! Just love your window box design and the flowers you chose to fill it! I just wanted to tell you how we hung our boxes. Our house, we are sure, was built by drunks on crack, and you’re liable to find a stud-where ever so we hung our boxes using a French cleat. That way the clear could be attached where needed but the box can be hung in the right spot. Just wanted to spread my little bit of knowledge! I just love your farm! 👍❤️🐝
Thank you! I never thought about using those, but thanks for sharing that tip!
Hi there! Sorry if I missed seeing it, but I was wondering if you happen to know what the brand of your plastic self-watering window box liners are. Thank you so much for sharing your knowledge and talents with us! 🤍🐝🌻🖤
Hello! I am not sure that I ever shared the brand. I found them at a local shop called Nixa Hardware. However, I am sure that any plastic self watering liner would work as long as they span the length of your window area.
Have a great day!
Sarah
Thank you so much – that helps. You have a great day too! 🤍